Collect Core Web Vitals from AMP pages using Google Analytics
Let’s look at how to capture core web vitals from AMP pages, report the metrics to google universal analytics and create visualized reports for core web vitals.
1) Introduction
Google is considering Core Web Vitals as Ranking Signals from May 2021 onwards. This means that the Publishers may lose traffic if their sites perform bad in terms of web vitals. For this reason, most of them are now implementing AMPHTML as a way to increase their site’s user experience.
Even though AMP is proven to increase your site’s vital metrics by a lot, You still need to measure the vitals to make sure AMP is delivering on its claims. Thankfully, AMP also allows us to capture these metrics via its amp-analytics module.
2) Setup amp-analytics
To add amp-analytics to your pages, You first need to add the following snippet in your <head> section.
<script async custom-element="amp-analytics" src="https://cdn.ampproject.org/v0/amp-analytics-0.1.js"></script>
This will import the analytics extension to our page. With this module, we can report data to various supported vendors . In our case, We are going to report our metrics to Google Analytics.
Note that Google Analytics 4 is not yet supported in amp-analytics as it is currently in alpha.
3) Using Google Analytics on AMP
Next you need to insert an <amp-analytics> tag with type as “googleanalytics”.
A typical configuration For tracking page views would look like below.
<amp-analytics type="googleanalytics">
    <script type="application/json">
        {
          "vars": {
            "account": "👉 Provide site tracking ID here (e.g. UA-XXXXX-Y) 👈"
          },
          "triggers": {
            "trackPageview": {
              "on": "visible",
              "request": "pageview",
              "vars": {
                "title": "All analytics will show this string as the title"
              }
            }
          }
        }
</script>
</amp-analytics>
Here, "on": "visible" is a trigger definition. And, "request": "pageview" is we telling amp to call pageview
endpoint
from default Google Analytics configuration. The
endpoint would contain placeholder variables which would be resolved at runtime, and amp-analytics will fire the
analytics requests.
4) Collect Core Web Vitals as Google Analytics Events
So far we only talked about plain old analytics. For capturing web vitals, amp exposes a list of metrics as variables . But, we are interested in only the three core web vitals. They are,
| Vitals | Also Known as | amp-analytics variable |
|---|---|---|
| Cumulative Layout Shift | CLS | ${cumulativeLayoutShift} |
| First Input Delay | FID | ${firstInputDelay} |
| Largest Contentful Paint | LCP | ${largestContentfulPaint} |
You can easily pass these variables as event values to the event endpoint along with appropriate category, action and label.
However, there is one problem. The Google Universal analytics will only take integers for event values . As the vitals we are trying to capture are usually non integers, We need to round them up. Also CLS is usually lower than 1. So always multiply CLS by 1000 for better precision.
For making such calculations before submitting the analytics call would require some form of javascript. However, AMP
doesn’t allow us to run scripts like that. Instead it
provides few utility macros
to perform basic operations on these values. But we are most interested in CALC, A macro for performing basic
arithmetic.
So let’s add the triggers for event with appropriate values, action and label.
<amp-analytics type="googleanalytics">
    <script type="application/json">
        {
          "vars": {
            "account": "👉 Provide site tracking ID here (e.g. UA-XXXXX-Y) 👈"
          },
          "triggers": {
            "trackPageview": {
              "on": "visible",
              "request": "pageview",
              "vars": {
                "title": "All analytics will show this string as the title"
              }
            },
            "capture CLS": {
              "on": "visible",
              "request": "event",
              "vars": {
                "eventCategory": "Web Vitals",
                "eventAction": "CLS",
                "eventLabel": "${clientId}-${pageViewId}-CLS",
                "eventValue": "$CALC(${cumulativeLayoutShift},1000,multiply,true)"
              }
            },"capture FID": {
              "on": "visible",
              "request": "event",
              "vars": {
                "eventCategory": "Web Vitals",
                "eventAction": "FID",
                "eventLabel": "${clientId}-${pageViewId}-FID",
                "eventValue": "$CALC(${cumulativeLayoutShift},0,add,true)"
              }
            },"capture LCP": {
              "on": "visible",
              "request": "event",
              "vars": {
                "eventCategory": "Web Vitals",
                "eventAction": "LCP",
                "eventLabel": "${clientId}-${pageViewId}-LCP",
                "eventValue": "$CALC(${cumulativeLayoutShift},0,add,true)"
              }
            }
          }
        }
</script>
</amp-analytics>
In the above example, I am deliberately hardcoding the event name and category. You will soon see why. Also, to identify unique events, I’m generating event label by combining clientId and pageViewId. This should be unique for each page view throughout the world wide web.
Also note that we use $CALC macro for multiplying CLS by 1000. The last parameter is a flag to denote if we should
round off the result. Similarly, We calculated the FID and LCP values by adding zero and then rounding up. This hack
would simply round off the value to the near integer.
If you set up all of these correctly, You should start seeing events in your Google Analytics realtime dashboard.
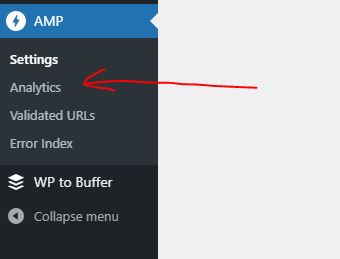
4.1) A note for Wordpress Users
If you are using AMP plugin in your wordpress site, you can insert the above configuration by navigating to AMP ->
Analytics.
 .
.
Now fill googleanalytics for the type field. It should ideally give you a typical setting as we shown earlier. You can
replace the entire JSON with the one found in section three.
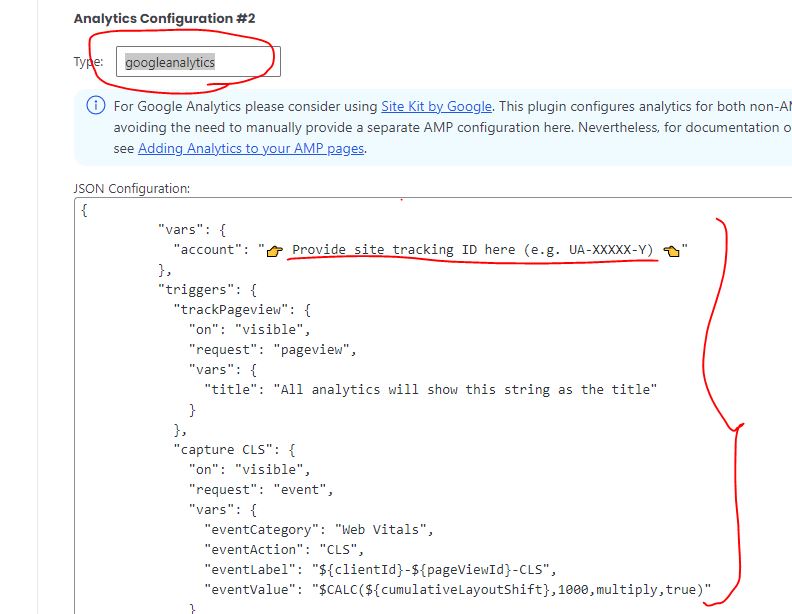 Don’t forget to fill in the UA tracking code of your own. I use something similar with my other blog at https://springhow.com.
5) Test the setup
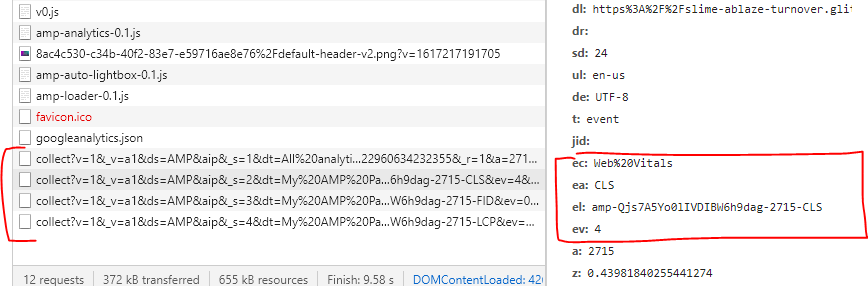
I created a simple example that demonstrates the amp-analytics module capturing core web vitals at this glitch.
Once you open this project in a new tab, you can see that the CLS, FID and LCP values being captured by Google Analytics from the AMP page.
6) Visualizing the results using Web Vitals Report
Web Vitals report is a free tool available for us to analyze the captured web vital metrics. This application will provide a histogram and timeline of each Web Vitals metric, and it will also let you compare results across different segments.
To use this application, click the “Sign in with Google” button. The sign-in flow will prompt you for permission to
allow the app to view your Google Analytics data. This permission is required for generating the reports. After
permission, Select appropriate property and view. Finally, select a date range and segments to compare.
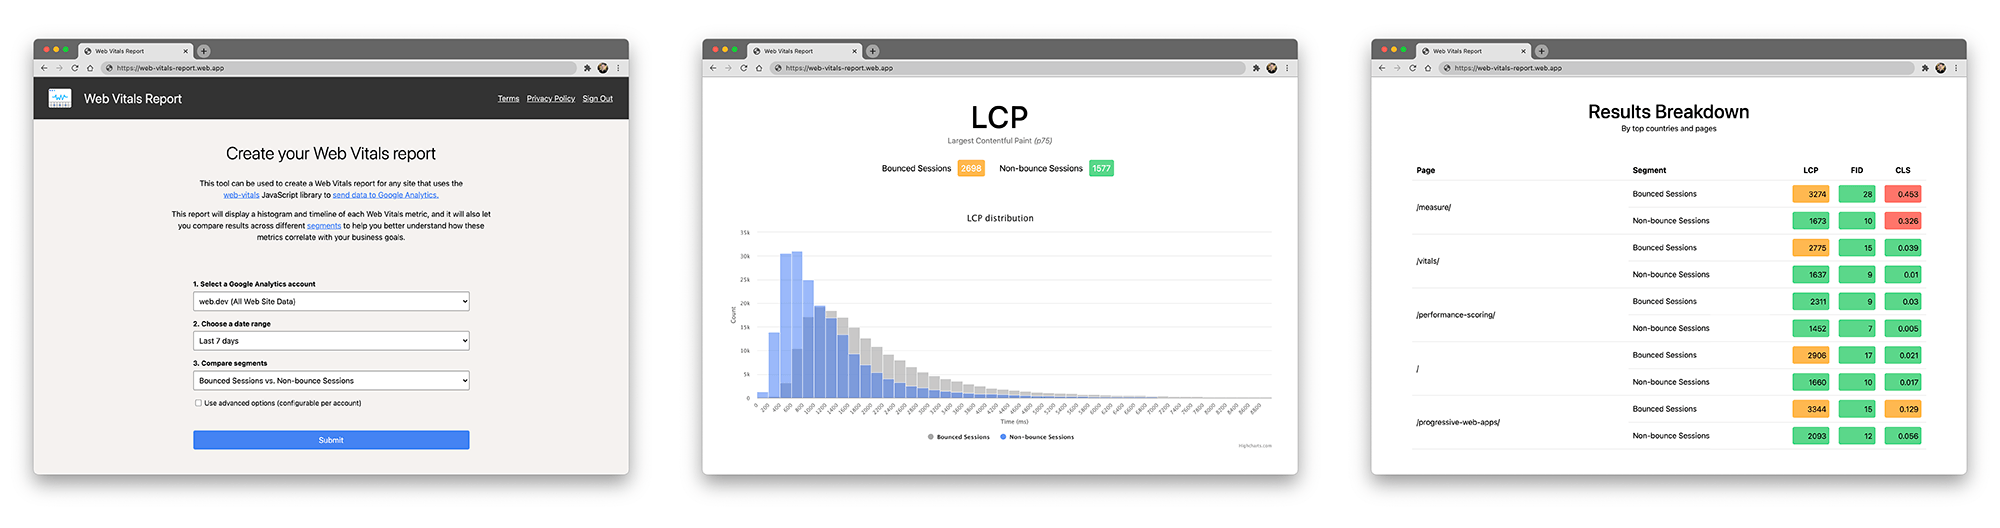 While the app provides useful default segments to compare, You can also use the segments you created on your GA
property. You can learn more on this at web-vitals-report repository.
While the app provides useful default segments to compare, You can also use the segments you created on your GA
property. You can learn more on this at web-vitals-report repository.
7) Conclusion
I hope you learned about how to generate Core web Vitals report for an amp page using Google Analytics, Web Vitals report and amp-analytics module.